This article will explore:
What is MongoDB Sharding?
Sharding is a method for distributing or partitioning data across multiple machines.
It is useful when no single machine can handle large modern-day workloads, by allowing you to scale horizontally.
Horizontal scaling, also known as scale-out, refers to adding machines to share the data set and load. Horizontal scaling allows for near-limitless scaling to handle big data and intense workloads.
Sharding Architecture
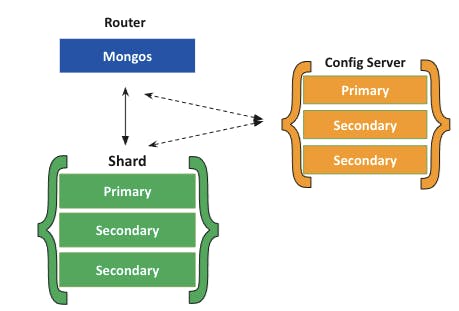
In MongoDB, a sharded cluster consists of:
- Shards
- Mongos
- Config servers
A shard is a replica set that contains a subset of the cluster’s data.
The mongos acts as a query router for client applications, handling both read and write operations. It dispatches client requests to the relevant shards and aggregates the result from shards into a consistent client response. Clients connect to a mongos, not to individual shards.
Config servers are the authoritative source of sharding metadata. The sharding metadata reflects the state and organization of the sharded data. The metadata contains the list of sharded collections, routing information, etc.
In its simplest configuration (a single shard), a sharded cluster will look like this:
Sharding Benefits
Sharding allows you to scale your database to handle increased loads to a nearly unlimited degree. It does this by increasing read/write throughput, and storage capacity. Let’s look at each of those in a little more detail:
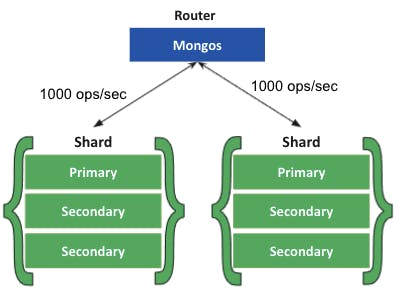
- Increased read/write throughput: You can take advantage of parallelism by distributing the data set across multiple shards. Let’s say one shard can process one thousand operations per second. For each additional shard, you would gain an additional one thousand operations per second in throughput.
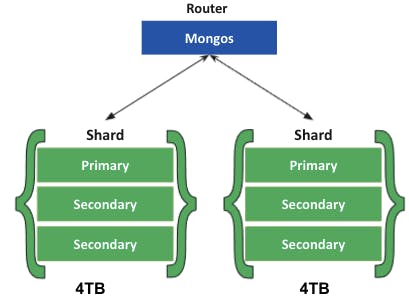
- Increased storage capacity: Similarly, by increasing the number of shards, you can also increase overall total storage capacity. Let’s say one shard can hold 4TB of data. Each additional would increase your total storage by 4TB. This allows near-infinite storage capacity.
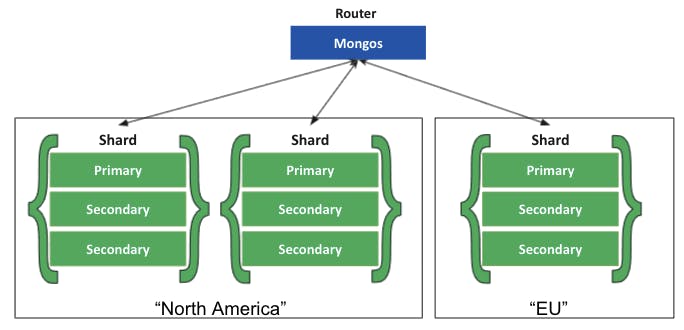
- Data Locality: Zone Sharding allows you to easily create distributed databases to support geographically distributed apps, with policies enforcing data residency within specific regions. Each zone can have one or more shards.
Data Distribution
Shard Key
MongoDB shards at the collection level. You choose which collection(s) you want to shard. MongoDB uses the shard key to distribute a collection’s documents across shards. MongoDB splits the data into “chunks”, by dividing the span of shard key values into non-overlapping ranges. MongoDB then attempts to distribute those chunks evenly among the shards in the cluster.
Shard keys are based on fields inside each document. The values in those fields will decide on which shard the document will reside, according to the shard ranges and amount of chunks. This data is stored and kept in the config server replica set.
The shard key has a direct impact on the cluster’s performance and should be chosen carefully. A suboptimal shard key can lead to performance or scaling issues due to uneven chunk distribution. You can always change your data distribution strategy by changing your shard key. Use the following documentation to choose the best shard key for you.
A background process known as the “balancer” automatically migrates chunks across the shards to ensure that each shard always has the same number of chunks.
Sharding Strategy
MongoDB supports two sharding strategies for distributing data across sharded clusters:
- Ranged Sharding
- Hashed Sharding
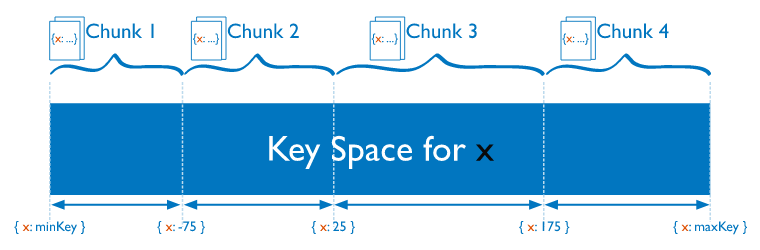
Ranged sharding divides data into ranges based on the shard key values. Each chunk is then assigned a range based on the shard key values.
A range of shard keys whose values are “close” are more likely to reside on the same chunk. This allows for targeted operations as a mongos can route the operations to only the shards that contain the required data.
Hashed Sharding involves computing a hash of the shard key field’s value. Each chunk is then assigned a range based on the hashed shard key values.
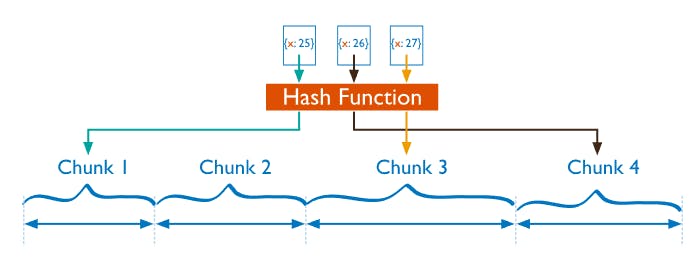
While a range of shard keys may be “close”, their hashed values are unlikely to be on the same chunk. Data distribution based on hashed values facilitates more even data distribution, especially in data sets where the shard key changes monotonically. However, hashed sharding does not provide efficient range-based operations.
How to Implement Sharding
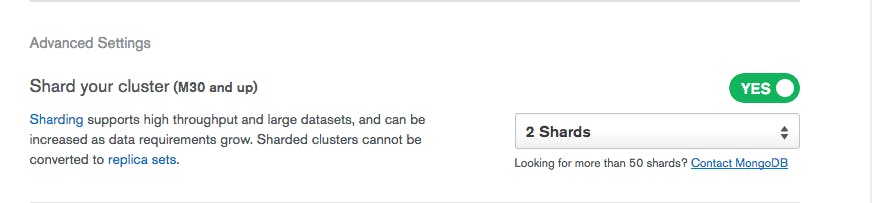
The easiest, most convenient, and most cost-effective way to deploy and manage a sharded cluster is via MongoDB Atlas, the Database-as-a-Service that simplifies sharded cluster implementation.
All you need to do is turn it on:
Why Use MongoDB Atlas?
- Deploy your sharded cluster in minutes with a few simple clicks. This allows you to span your cluster across regions and cloud providers as well as build a single cluster to cover across globe network.
- Scale in and out by a single command with unified monitoring and performance advisory tools.
- It’s cost-effective as you pay only for the shards infrastructure, and not for config servers or routers.
- It offers built-in enterprise-grade security and encryption for your sharded cluster access and auditing.
- No-downtime software upgrades and Operating System patching is done for you.
If you want to do it yourself, follow these instructions. Make sure to replace anything between < and > with the relevant values for your setup. We will set up a config server and shard(s), both on three-node replica sets, as well as a mongos server.
Let’s get started.
1. Set Up the Config Server
Each config server replica set can have any number of mongod processes (up to 50), with the following exceptions: no arbiters and no zero-priority members. For each of those, you will need to start it with the --configsvr option. For example:
mongod --configsvr --replSet <configReplSetName> --dbpath <path> --port 27019 --bind_ip localhost,<hostname(s)|ip address(es)>From there, connect to just one of the replica set members:
mongo --host <hostname> --port 27019And run rs.initiate() on just one of the replica set members:
rs.initiate(
  {
    _id: "<configReplSetName>",
    configsvr: true,
    members: [
      { _id : 0, host : "<cfg1.example.net:27019>" },
      { _id : 1, host : "<cfg2.example.net:27019>" },
      { _id : 2, host : "<cfg3.example.net:27019>" }
    ]
  }
)
With the config server replica set up and running, we can create the shards.
2. Set Up Shards
As mentioned before, each shard is a replica set in and of itself. This process will be similar to the config servers, but using the --shardsvr option. Make sure to use a different replica set name for each shard.
mongod --shardsvr --replSet <shardReplicaSetNamereplSetname> --dbpath <path> --port 27018 --bind_ip <cluster hostname(s)|ip address(es)>From there, connect to just one of the replica set members:
mongo --host <hostname> --port 27018And run rs.initiate() on just one of the replica set members. Make sure you leave out the --configsvr option:
rs.initiate(
  {
    _id: "<shardReplicaSetNamereplSetnamereplSetName>",
    members: [
      { _id : 0, host : "<shard-host1.example.net:2701827019>" },
      { _id : 1, host : "<shard-host2.example.net:2701827019>" },
      { _id : 2, host : "<shard-host3.example.net:2701827019>" }
    ]
  }
)
3. Start the mongos
Finally, set up the mongosand point it at your config servers replica set:
mongos --configdb
<configReplSetName>/<cfg1.example.net:27019>,<cfg2.example.net:27019>,<cfg3.example.net:27019> --bind_ip localhost,<cluster hostname(s)|ip address(es)>
In a production environment, more than one mongos must be deployed to avoid a bottleneck. Usually, starting with at least three mongos instances is a good practice.
4. Configure and Turn On Sharding for the Database
Connect to your mongos:
mongo --host <hostname> --port 27017And add your shards to the cluster. Do this once for each shard:
sh.addShard( "<shardReplicaSetName>/<shard-host1.example.net:27018>,<shard-host2.example.net:27018>,<shard-host3.example.net:27018>")Enable sharding on your database:
sh.enableSharding("<database>")Finally, shard your collection using the sh.shardCollection() method. You can do this either via hashed sharding, which will spread your data evenly across shards...
sh.shardCollection("<database>.<collection>", { <shard key field> : "hashed" , ... } )...or via range-based sharding, which allows you to optimize distribution across shards based on the shard key values. For certain sets of data, this will make queries across ranges of data more efficient. The command is as follows:
sh.shardCollection("<database>.<collection>", { <shard key field> : 1, ... } )And that’s it! You’ve now set up your first sharded cluster. Any application interaction from now on should be done via the routers (mongos instances) only.
For More Information
Check out the sharding manual or sharding methods in the MongoDB documentation.
FAQs
How does MongoDB sharding work?
What are shard keys in MongoDB?
Shard keys are based on fields inside each document. The values in those fields will decide on which shard the document will reside, according to the shard ranges and amount of chunks. This data is stored and kept in the config server replica set.
Each shard key will require an index or auto-build one, as part of the sharding command, if the collection is empty and the required index is missing. The shard key has a direct impact on the cluster performance and could lead to bottlenecks for your application access patterns. Use the following documentation to choose the best shard key for you.